The perfect gluten free cupcake for your next birthday party! Don’t be scared of these, they’re easier than the look and pack a surprise when your guests bite into them.
Does anyone else get mesmerised watching cake decorating videos on instagram? I find it so satisfying and have been wanting to start decorating myself. It really wasn’t as hard as I thought it would be. All you need is some buttercream icing, food colouring plus a piping bag and star tip.
The cup cakes: 1. The flour I use is Bobs Red Mills Cup4Cup gluten free flour, Ardor gluten free or Orgran gluten free. It works amazing with all three, I’ve tried it with all to triple test the recipe.
2. You will need a scale to measure the ingredients, it will definitely help give you an amazing end result.
3. If you don’t have time to make the cupcakes you can always buy a gluten free packet mix.
The icing: is a an easy buttercream, coloured with liquid food colouring. Some people prefer gel colouring as they don’t thin the icing, but I couldn’t easily source any that was gluten free. The liquid food colouring works perfectly every time and doesn’t thin the icing.
The decorating: Because thats what we’re all here for! I’ve included step-by-step pictorial instructions below to help with this process. I’m hoping to do a video soon, just waiting on a tripod from Amazon to film from above. The cupcakes pictured are my vanilla ones I’ve been working on for a while, they’re nearly ready!
Fill them: With gluten free sprinkles from the supermarket, or choc decorating bits, or even gluten free caramel m&m’s.
I hope you enjoy!
Please let me know if you have any questions.
Kath xx
Rainbow Swirl Icing
1. Colour the icing
I used Queen food colouring from the supermarket. My favourite colours to do are blue, red and yellow. I also love to do purple, blue and hot pink together.
2. Put into piping bags
I use disposable sandwich bags. Snip the end of each to allow for piping.
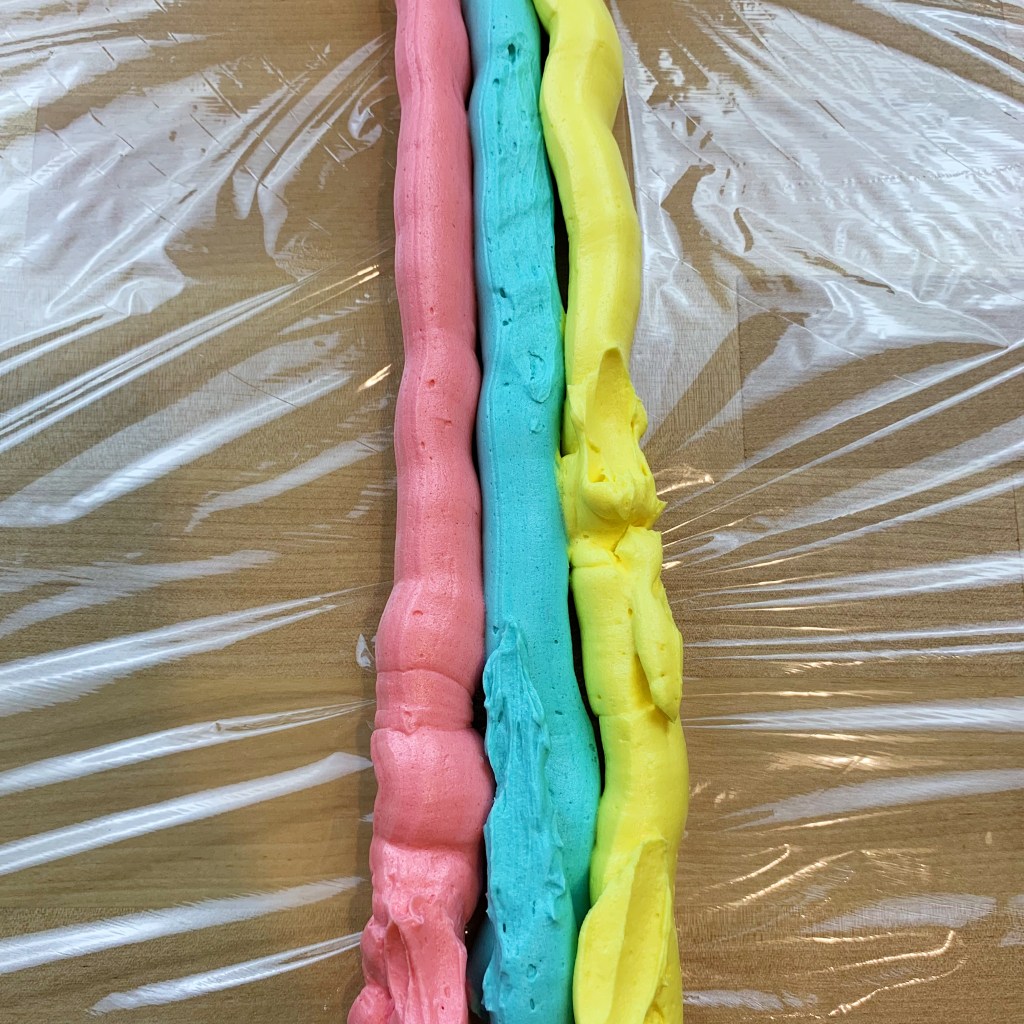
3. Pipe onto clingwrap
Lay out clingwrap, 30cm long. Pipe icing onto it, with blue in the middle. Think primary colours!
Pipe blue
Pipe pink on one side
Pipe yellow on the other
4. Roll icing up
Roll the icing up from one side into a log.
Twirl one of the open ends of the icing shut.
5. Place in your piping bag
Fit a piping bag with a star tip.
Put the wrapped icing, open end first into piping bag (to allow it to squeeze out).
How to create the pinata SURPRISE!
1. Cut a hole in the cup cake.
Do not cut all the way to the bottom. Save the top (trim it to be about 0.5 cm) to use as a cover later.
2. Fill with sprinkles.
I used sprinkles but you could also use gluten free caramel m&m’s.
Preheat your oven to 170 degrees Celsius. Line a 12-cup muffin pan with muffin cases.
In a large bowl sift the gluten free flour, cocoa powder, baking powder and baking soda. Add the salt and sugar, and whisk to combine.
Create a well in the centre and add the oil, eggs and water. Whisk to combine. The mixture should be runny and smooth. If there’s lumps give another quick whisk.
Spoon mixture into prepared muffin pan until about 2/3 full and smooth the tops.
Place the pan in the oven and bake for 18-20 minutes or until a skewer inserted in the middle comes out clean. Remove from the oven and allow to sit in the pan for 5 minutes before transferring to a wire rack to cool.
Buttercream icing:
In a large bowl, use a hand held mixer to beat the butter until softened. On a slow speed, add the icing sugar to avoid icing going everywhere. Then beat on high speed for 3 minutes until fluffy, scraping down the bowl regularly.
Add the vanilla and cream (or milk) and beat on high for 5 minutes. Scraping down the sides of the bowl regularly.
Divide the frosting into three bowls.
Colour the bowls to your desired colours. I did one with red, one with blue and one yellow. I added drops gradually until I reached the colour I wanted.
Lay out 30cm of clingwrap on your bench. Place your three different icing colours into three temporary zip lock piping bags. Snip the corner off each to allow for piping.
Pipe the icing strips side by side in the middle of the cling wrap. Place blue in the middle and pink and yellow either side (think primary colours!). Roll up the clingwrap and twist one end closed. Keep the other end open for piping.
Place the icing roll, open end first into the piping bag fitted with a 1M piping tip. Twist the piping bag closed, and press the icing towards the tip. When you squeeze all three colours will come out, both separately and blended together.
Putting it all together:
When the cupcakes are cooled carefully cut a small hole in the centre to about half-way down the cupcake. Do not cut all the way through. Remove, and trim to save a lid to cover the hole.
Fill hole with sprinkles. Cover with saved cupcake lid.
Using piping bag, pipe clockwise around the cake, slowly moving to the centre. The icing will build upwards and create a spiral. Top with more sprinkles. Enjoy!
Notes
* I’ve tested this recipe with both Ardor, Bobs Red Mill Cup4Cup and Orgran flour. All three worked perfectly. Check your gluten free blend contains xanthan gum. If it doesn’t add 1/2 tsp.